Tuesday, 31 January 2017

Thick Adult Female Slippers, approx. Size 6 (Part 3)

The Cuff

Attach your second colour.

Row 12
Ch 2
Fpdc all around
Sl st to top of 1st fpdc

Row 13
Ch 2
(fpdc, bpdc) all around
Sl st to top of 1st fpdc

Row 14
Ch 2
(fpdc, bpdc) all around
Sl st to top of 1st fpdc

Change colour (red in example)

Row 15
Ch 2
(fpdc, bpdc) all around
Sl st to top of 1st fpdc

Change colour (white in example)

Row 16
Ch 2
Hdc all around
Sl st to top of ch 2

Row 17
Ch 2
(fpdc, bpdc) all around
Sl st to top of 1st fpdc

I think next time I will do the colours differently, as I don't like how broken up the red appears. You can always do the cuff in one colour and skip the hdc row, and sc a row in a different colour as a finishing accent, or whatever you'd like.

2nd Sole

Repeat rows 1-3 of original sole (see part 1) in different colour (white in example)
Without tying off, line up soles together and sl st all the way around, using the stitches on the new sole and the front loops left around the edge of the 1st sole.
It should go like this:


Tie off and sew in ends with yarn needle. Repeat all steps the same for slipper #2!

Last Step

Enjoy your comfy new slippers or impress someone with your wonderful creative skills! These make a great gift.

Thick Adult Female Slippers, approx. Size 6 (Part 2)

Now we will be moving on to the upper part of the slipper.

The Boot

Row 1
Ch 3
Bldc all around (70 st total inc. ch 3)

Sl st to top of ch 3

Should look like this, with the front loops available for a later step:

It will seem like the upper part is loose at this point but that will start to change with the next row. This view is from the bottom of the slipper.

Row 2
Ch 2
Fpdc over next 33 st
Fpdc2tog x 8
Fpdc over next 20 st

Sl st to top of 1st fpdc

It should now be coming more inward:
Row 3
Ch 2
Fpdc all around

Sl st to top of 1st fpdc

Row 4
Ch 2
Fpdc over next 29 st
Fpdc2tog x 8
Fpdc over next 16 st

Sl st to top of 1st fpdc

Row 5
Ch 2
Fpdc all around

Sl st to top of 1st fpdc

Row 6
Ch 2
Fpdc over next 25 st
Fpdc2tog x 8
Fpdc over next 12 st
Sl st to top of 1st fpdc

Row 7
Ch 2
Fpdc all around
Sl st to top of 1st fpdc

Row 8
Ch 2
Fpdc over next 21 st
Fpdc2tog x 8
Fpdc over next 8 st
Sl st to top of 1st fpdc

Row 9
Ch 2
Fpdc all around 
Sl st to top of 1st fpdc

Row 10
Ch 2
Fpdc over next 21 st
Fpdc2tog x 4
Fpdc over next 8 st
Sl st to top of 1st fpdc

Row 11
Ch 2
Fpdc all around
Sl st to top of 1st fpdc

At the end of this, you can tie off your first colour and switch to colour #2 (white for me). Your slipper should look like this:
Then we can move on to part 3.


Thick Adult Female Slippers, approx. Size 6 (Part 1)


 These slippers were made for a friend, and since patterns rarely turn out how I expect, I just made up my own. Every new pattern takes some trial and error, and for something that involves a pair, I had to write it down. I documented the process in photos as well in hopes of providing guidance.

These slippers are fairly small, about a size 6 in my stitching, made to fit the person they are for. My feet are larger so I can't model them to see what they look like on. Next time I make larger ones I will post those as well.

Getting Started

Materials:


I used Bernat Premium Yarn (available at Walmart), in a light grey, with white and red as accent colours. The red is Red Heart just because that's what I had. You can use whatever colour combo you'd like.
Crochet Hook: 5.5mm
You'll also need scissors and a yarn needle. A measuring tape may also be helpful to determine if your slippers will be a similar size.

Legend:
ch - chain
st - stitch(es)
sl st - slip stitch
sc - single crochet
dc - double crochet
hdc - half double crochet
fpdc - front post double crochet
fpdc2tog - front post double crochet 2 stitches together
bldc - double crochet in back loop

The Sole
Row 1:
ch 22
ch 2, sc x 3 in 3rd st from hook
Sc in next 6 st
Hdc in next 6 st
Dc in next 8 st
Dc x 6 in last st
Working along other side, dc in next 8 st
Hdc in next 6 st
Sc in next 6 st

Sl to top of beginning ch 2

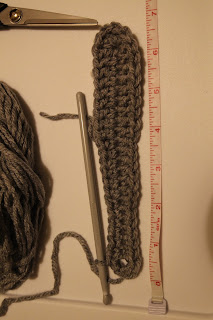
You should have something that looks like this, and for gauge, mine is about 6 and 3/4 inches:


Row 2:
Ch 2, sc in same st
2 sc in next 3 st
Sc in next 6 st
Hdc in next 6 st
Dc in next 8 st
2 dc in next 6 st
Dc in next 8 st
Hdc in next 6 st
Sc in next 6 st

Sl st to top of beginning ch 2

Row 3:
Ch 3
2 dc in next st
(1 dc, 2 dc) x 3
Dc in next 20 st
(1 dc, 2dc) x 6
Dc in next 20 st
Sl st to top of beginning ch 3

The finished sole should look like this:

And now you can move on to part 2!


Saturday, 28 January 2017

Welcome!

Welcome to my blog!

I've been crocheting for about 5 months now and I am completely addicted. I've been sharing my new hobby with friends, but I'd like to share it with others as well. My plan is to post some of the patterns I create so others may use them. This will take some time to set up, but hopefully it will be helpful to somebody!

Thanks for stopping by!